Get familiar with Spring Integration and Spring Cloud Stream using Spring Boot and learn how Microservices can communicate with each other. Time: 30 minutes.
Requirements
-
You will need RabbitMQ up and running.
Code Snippet Manager Stream App - Source
We are going create a Source (our Code Snippet Manager). This Source will use Spring Integration to read snippets from the File System and it will forward the snippet to a Sink application.
-
Open a browser and hit the url: http://start.spring.io
-
Click the Switch to the full version link.
-
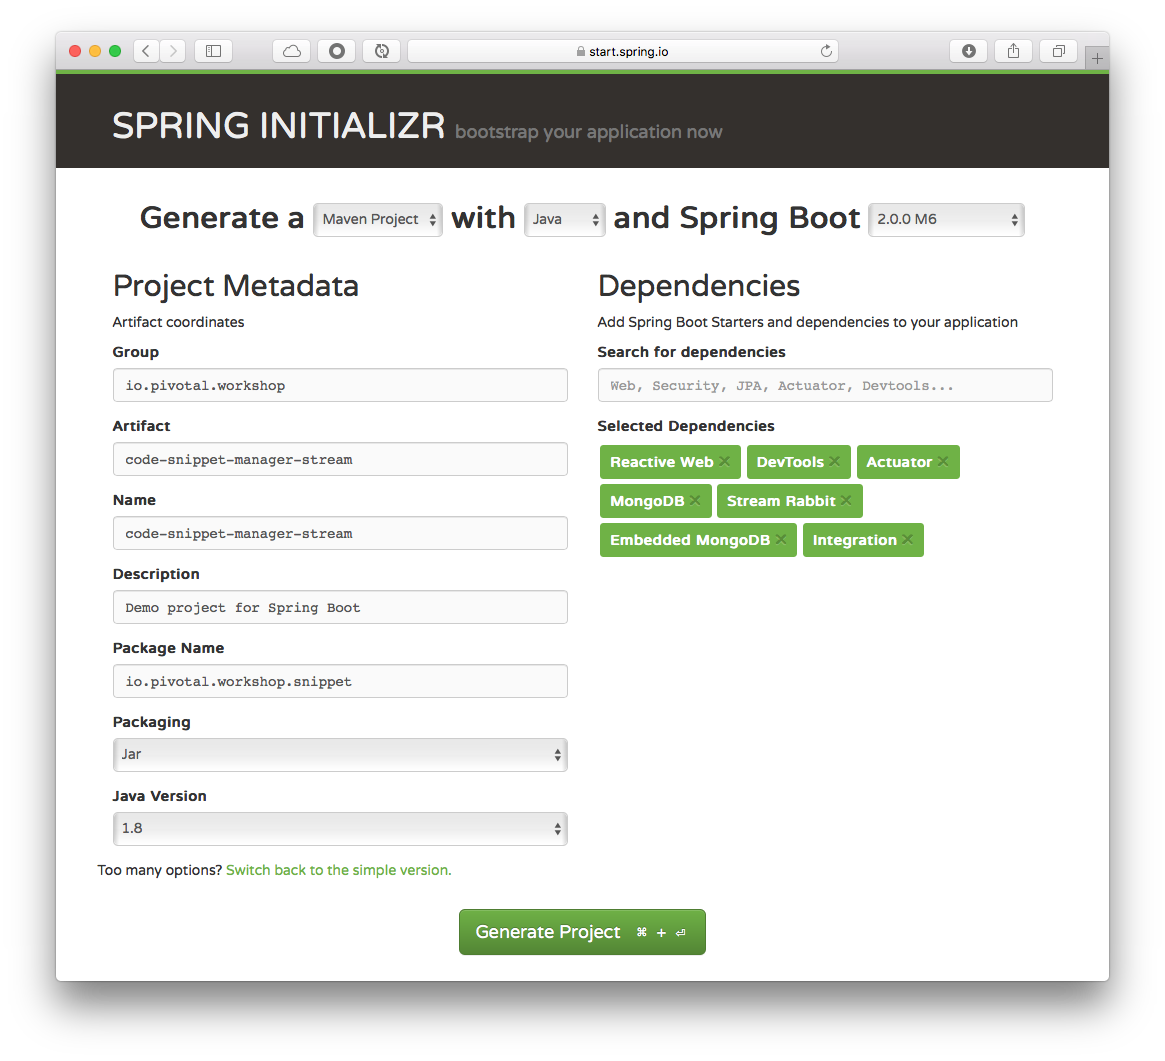
Fill out the Code Snippet Manager Stream App Project metadata with (See Figure 1.0):
Table 1. Code Snippet Manager Stream App Source - metadata Property Value Group:
io.pivotal.workshop
Artifact:
code-snippet-manager-stream
Name:
code-snippet-manager-stream
Package Name:
io.pivotal.workshop.snippet
Dependencies:
Reactive Web, DevTools, MongoDB, Actuator, Stream Rabbit, Embedded MongoDB, Integration
Spring Boot:
2.0.0.M7
Figure 1.0: Spring Initializr - http://start.spring.io Tip
TipYou can choose either Maven or Gradle project types. -
Type Reactive Web, DevTools, MongoDB, Reactive MongoDB, Actuator, Stream Rabbit, Embedded MongoDB and Integration in the Dependencies field and press Enter.
-
Click the Generate Project button.
-
Unzip the file in any directory you want.
-
Import your project in any IDE you want.
-
Copy ONLY the classes from the previous Lab (WebFlux), we are going to reuse them.
-
Is necessary to do several mofications to the pom.xml or build.gradle files. First modify the spirng-cloud-starter-stream-rabbit dependency to look like this:
pom.xml<dependency> <groupId>org.springframework.cloud</groupId> <artifactId>spring-cloud-starter-stream-rabbit</artifactId> <exclusions> <exclusion> <groupId>org.springframework.boot</groupId> <artifactId>spring-boot-starter-tomcat</artifactId> </exclusion> </exclusions> </dependency>or
buildf.gradlecompile('org.springframework.cloud:spring-cloud-starter-stream-rabbit'){ exclude module: "spring-boot-starter-tomcat" }This dependency is part of the Spring Cloud Stream; the Binder that we are going to use: RabbitMQ. This dependency brings Tomcat, something that we don’t need because we are using Netty instead for the reactive part.
-
Next, modify the pom.xml or build.gradle so the Embedded MongoDB is used at runtime.
pom.xml<dependency> <groupId>de.flapdoodle.embed</groupId> <artifactId>de.flapdoodle.embed.mongo</artifactId> <scope>runtime</scope> </dependency>or
build.gradleruntime('de.flapdoodle.embed:de.flapdoodle.embed.mongo') -
Because we are going to use Spring Integration to read from the File System we need to add the following dependencies:
pom.xml<dependency> <groupId>org.springframework.integration</groupId> <artifactId>spring-integration-file</artifactId> </dependency> <dependency> <groupId>org.springframework.integration</groupId> <artifactId>spring-integration-java-dsl</artifactId> </dependency> <dependency> <groupId>org.yaml</groupId> <artifactId>snakeyaml</artifactId> </dependency>or
build.gradlecompile('org.springframework.integration:spring-integration-file') compile('org.springframework.integration:spring-integration-java-dsl') compile('org.yaml:snakeyaml') -
This application will have its own MongoDB (embedded) running in a random port, so it’s necessary to configure the client so it can connect. Create a io.pivotal.workshop.snippet.config.SnippetConfiguration class.
src/main/java/io/pivotal/workshop/snippet/config/SnippetConfig.javapackage io.pivotal.workshop.snippet.config; import com.mongodb.MongoClient; import org.springframework.context.annotation.Bean; import org.springframework.context.annotation.Configuration; import org.springframework.context.annotation.DependsOn; import org.springframework.core.env.Environment; @Configuration public class SnippetConfiguration { private Environment environment; public SnippetConfiguration(Environment environment) { this.environment = environment; } @Bean @DependsOn("embeddedMongoServer") //(1) public MongoClient reactiveMongoClient() { int port = this.environment.getProperty("local.mongo.port", Integer.class); return new MongoClient("localhost",port); } }-
Take a look that the MongoClient that it will be created after the embeddedMongoServer bean (due the @DependsOn annotation).
-
-
If you run your application, it should work with out any issues, the only difference is that you are using an Embedded MongoDB.
-
Create (or copy/reuse from another Lab) a io.pivotal.workshop.snippet.config.SnippetProperties class. This class will have just the path where the snippet will be read.
src/main/java/io/pivotal/workshop/snippet/config/SnippetProperties.javapackage io.pivotal.workshop.snippet.config; import org.springframework.boot.context.properties.ConfigurationProperties; @ConfigurationProperties(prefix = "snippet") public class SnippetProperties { private String path = "/tmp"; private String extension = "*.code"; public String getPath() { return path; } public void setPath(String path) { this.path = path; } public String getExtension() { return extension; } public void setExtension(String extension) { this.extension = extension; } } -
Next lets create the Stream Source. Create the io.pivotal.workshop.snippet.stream.SnippetFileSystemIntegration class, in this class we are going to use Spring Integration with Spring Cloud Stream:
src/main/java/io/pivotal/workshop/snippet/stream/SnippetFileSystemIntegration.javapackage io.pivotal.workshop.snippet.stream; import io.pivotal.workshop.snippet.config.SnippetProperties; import io.pivotal.workshop.snippet.integration.SnippetTransformer; import org.springframework.boot.context.properties.EnableConfigurationProperties; import org.springframework.cloud.stream.annotation.EnableBinding; import org.springframework.cloud.stream.messaging.Source; import org.springframework.context.annotation.Bean; import org.springframework.integration.dsl.IntegrationFlow; import org.springframework.integration.dsl.IntegrationFlows; import org.springframework.integration.dsl.Pollers; import org.springframework.integration.dsl.Transformers; import org.springframework.integration.file.dsl.Files; import org.springframework.integration.file.transformer.FileToStringTransformer; import java.io.File; @EnableConfigurationProperties(SnippetProperties.class) @EnableBinding(Source.class) public class SnippetFileSystemIntegration { private SnippetProperties snippetProperties; private SnippetTransformer snippetTransformer; public SnippetFileSystemIntegration(SnippetProperties snippetProperties, SnippetTransformer snippetTransformer) { //(1) this.snippetProperties = snippetProperties; this.snippetTransformer = snippetTransformer; } @Bean public IntegrationFlow snippetFlow(){ //(2) return IntegrationFlows.from( Files .inboundAdapter(new File(this.snippetProperties.getPath())) //(3) .preventDuplicates(true) .patternFilter(this.snippetProperties.getExtension()), e -> e.poller(Pollers.fixedDelay(5000L))) //(4) .transform(new FileToStringTransformer()) //(5) .transform(Transformers.converter(this.snippetTransformer)) //(6) .channel(Source.OUTPUT) //(7) .get(); } }-
The constructor is using the SnippetProperties and the SnippetTransformer (that we are going create later) instances.
-
We are declaring the IntegrationFlow (this is part of Spring Integration) that will read files from the directory (from the snippet.path property).
-
Spring Integration provides an Inbound Adapter that will read the files with the extension provided (from the snippet.extension property).
-
The Inbound Adapter will polling from file very 5 seconds (Poller).
-
We are going to use a transform that will read the file and convert it into a String. The class FileToStringTransformer is part of the Spring Integration out-of-the-box utility classes.
-
This transformer uses a custom transformer (SnippetTransformer), the previous transformer will send the text in the file into this new transformer.
-
This will be the final step, where to send the transformed message (a Snippet object), in this case it will use a channel named: OUTPUT.
-
-
Create the io.pivotal.workshop.snippet.integration.SnippetTransformer class, this class will transform the String into an Snippet object.
src/main/java/io/pivotal/workshop/snippet/integration/SnippetTransformer.javapackage io.pivotal.workshop.snippet.integration; import io.pivotal.workshop.snippet.domain.Snippet; import org.springframework.core.convert.converter.Converter; import org.springframework.lang.Nullable; import org.springframework.stereotype.Component; import org.yaml.snakeyaml.Yaml; @Component public class SnippetTransformer implements Converter<String,Snippet> { //(1) @Nullable @Override public Snippet convert(String snippet) { return new Yaml().loadAs(snippet,Snippet.class); //(2) } }-
Here we need to be compliant witht the Converter interface. This a generic interface, its first type is what it receives (the String, the file’s content) and the second, the object converted to (the Snippet object).
-
We are using the Yaml object (meaning that our file will have a YAML format) to convert it to Snippet.
-
-
Next, open the src/main/resources/application.properties file a modify it to look like this:
src/main/resources/application.properties# Snippet snippet.path=/tmp/snippets snippet.extension=*.code spring.cloud.stream.bindings.output.destination=snippetThe spring.cloud.stream.bindings.output.destination is the property that specifies the output channel where the message will be sent (in this case the Snippet object)
-
Now we are ready, but before running or testing it, we are going to create another application that will receive the Snippet object and just print it out into the console.
Code Snippet Manager Stream Log App - Sink
We are going create now a Sink. This Sink will just print out the Snippet object that was sent by the previous app.
-
Open a browser and hit the url: http://start.spring.io
-
Click the Switch to the full version link.
-
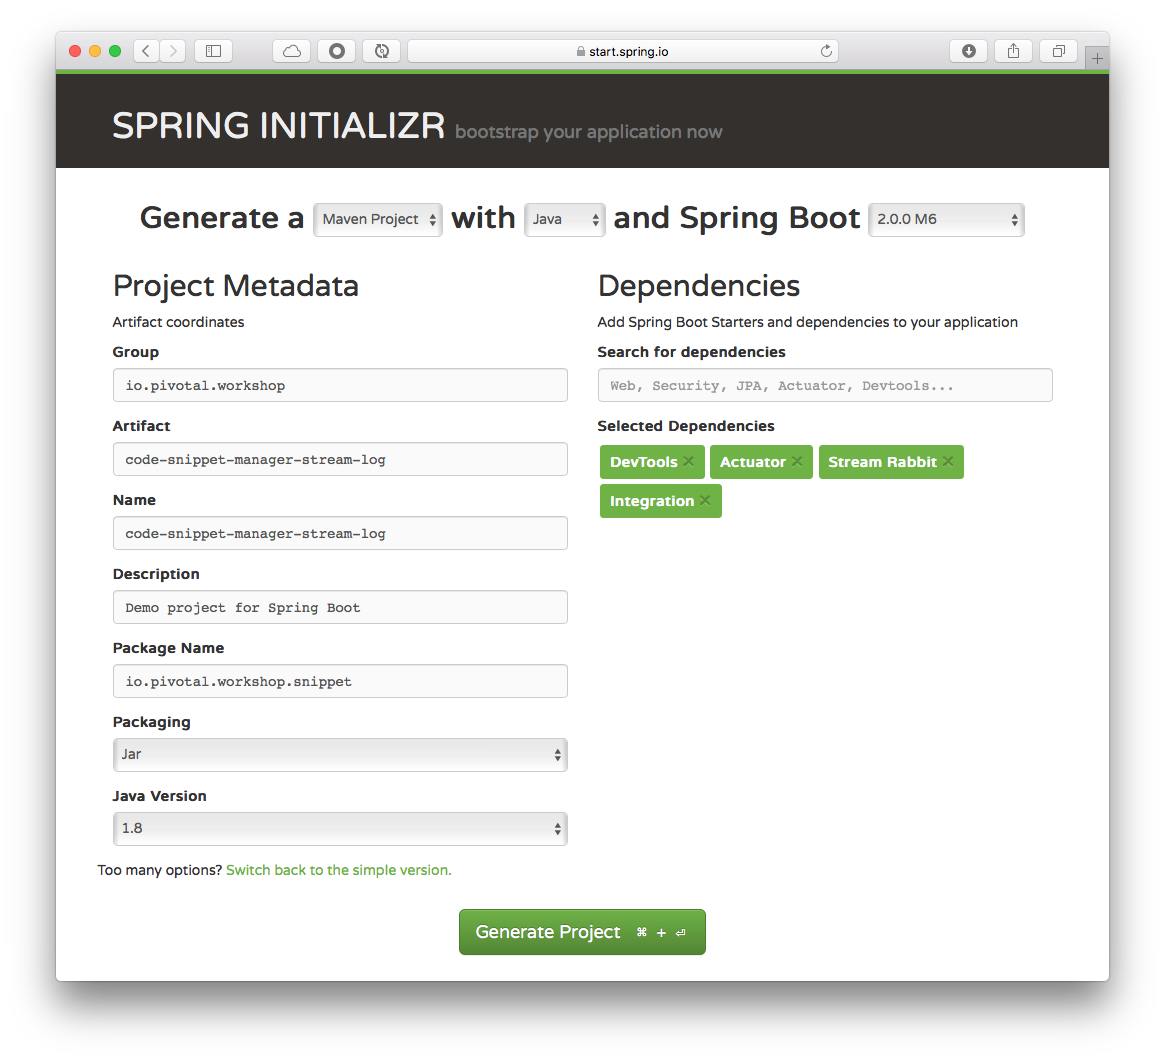
Fill out the Code Snippet Manager Log App Project metadata with (See Figure 1.0):
Table 2. Code Snippet Manager Stream Log App Sink - metadata Property Value Group:
io.pivotal.workshop
Artifact:
code-snippet-manager-stream-log
Name:
code-snippet-manager-stream-log
Package Name:
io.pivotal.workshop.snippet
Dependencies:
DevTools, Actuator, Stream Rabbit, Integration
Spring Boot:
2.0.0.M7
Figure 1.0: Spring Initializr - http://start.spring.io Tip
TipYou can choose either Maven or Gradle project types. -
Type DevTools, Actuator, Stream Rabbit and Integration in the Dependencies field and press Enter.
-
Click the Generate Project button.
-
Unzip the file in any directory you want.
-
Import your project in any IDE you want.
-
Copy only the Language and Snippet classes over. REMOVE the @Document, @Id and @DebRef annotations, we are not going to use them.
-
Create the io.pivotal.workshop.snippet.stream.SnippetLogger class.
src/main/java/io/pivotal/workshop/snippet/stream/SnippetLogger.javapackage io.pivotal.workshop.snippet.stream; import io.pivotal.workshop.snippet.domain.Snippet; import org.slf4j.Logger; import org.slf4j.LoggerFactory; import org.springframework.cloud.stream.annotation.EnableBinding; import org.springframework.cloud.stream.annotation.StreamListener; import org.springframework.cloud.stream.messaging.Sink; @EnableBinding(Sink.class) public class SnippetLogger { private Logger log = LoggerFactory.getLogger("[SNIPPET LOGGER]"); @StreamListener(Sink.INPUT) //(1) public void log(Snippet snippet){ log.info(snippet.toString()); } }-
Here the importat part is the use of the @StreamListener(Sink.INPUT) annotation that will listen for any incoming Snippet message through the INPUT channel. Then it will be just logged.
-
-
Open the src/main/resources/application.properties file and modify it to look like this:
src/main/resources/application.propertiesserver.port=8181 spring.cloud.stream.bindings.input.destination=snippetSee that here we are going to use the port 8181 and the spring.cloud.stream.bindings.input.destination property that will be listen to (in this case the input channel: snippet).
-
Now is time to test these microservices!
Testing
This part of the lab involves testing directly into these two microservices.
-
Make sure you have RabbitMQ up and running.
-
Make sure you have the /tmp/snippets (or C:\tmp\snippets) directory with write permissions.
-
Start your code-snippet-manager-stream-log application.
-
Start your code-snippet-manager-stream application.
-
Create some code snippets files OUTSIDE the /tmp/snippets (or C:\tmp\snippets) directory first. These files will have a YAML format and they will contain a particular structure:
hello-world-erl.codetitle: Hello World description: A Erlang Hello World lang: { name: Erlang, syntax: erl } code: | -module(hello). -export([hello_world/0]). hello_world() -> io:fwrite("hello, world\n").hello-world-javascript.codetitle: Hello World description: A JavaScript Hello World lang: { name: JavaScript, syntax: js } code: | console.log("Hello World"); -
Copy these files into the /tmp/snippets (or C:\tmp\snippets) directory.
-
See how the code-snippet-manager-stream-log application print the receive Snippet objects.
Challenges
-
In the SnippetTransformer add a logic to save the Snippet into the Embedded MongoDB so it can be viewed over the http://localhost:8080/logs and the http://localhost:8080/snippets:
-
Create a io.pivotal.workshop.snippet.service.SnippetService class. This class will be a facade for all repository operations so it can be reused by the SnippetHandler and the SnippetTransformer classes.
-
HOMEWORK
-
Review the following link to get more information about Spring Cloud Projects: http://projects.spring.io/spring-cloud/